If you’re a fan of films and TV you’ll probably keep track of what you’re watching. While there are online services such as Trakt and Simkl some might want a bit more control over their watch history — especially when you factor in the price of some of these tracking services.
That’s where Yamtrack comes in.
It’s an open source self-hosted media tracking server which runs in a docker instance and can track a variety of media including TV shows, movies, anime, games, books and more — you can even add your own media types if you want!
If you’re interested in running your own media tracking server you can find out more information about Yamtrack here.
The Problem: A Missing Link in Media Tracking
Up until recently I was a VIP member of Trakt and this gave me the ability to display a “Recently Watched” widget on my Reviews Website which I thought was a nice addition so that my readers could see what I might be reviewing next. But when Trakt announced their 100% price hike for current members I knew I had to find an alternative and while there are other good services out there, none quite worked exactly the way I wanted.
Then I found Yamtrack.
Yamtrack is a fantastic, lightweight way to keep a pulse on what you’re watching. However, as a former Trakt user, I noticed a frustrating gap: there was no easy way to automatically display my “Recently Watched” activity on my own website as I had been previously.
I wanted a simple widget or a line of text on my site that said, “Hey, I just finished watching X,” without me having to manually update it every time I hit the sofa.
The Solution: Yamtrack To WordPress Sync
After searching for a plugin and finding nothing, I decided to build it myself.
Yamtrack To WordPress Sync is a lightweight WordPress plugin that creates a secure bridge between your Yamtrack data and your WordPress site. It doesn’t bloat your site with heavy scripts; instead, it uses a simple Python middleman to “ping” your site whenever your watch history updates.
How It Works
The system consists of two small parts:
- The WordPress Plugin: Handles the display and provides a secure API endpoint.
- The Python Script: A tiny script you run on your computer (or a server/Raspberry Pi) that watches your Yamtrack feed and tells WordPress when something changes.
Key Features
- Shortcode Support: Use [kwwd_show_yamtrack_last_watched] anywhere-in your sidebar, footer, or on a dedicated “Now Watching” page.
- Automatic Timezones: The plugin respects your WordPress General Settings, so the “Watched at” time always looks correct for your local time.
- Privacy First: You generate a unique Secret Key so only your script can update your site.
- Performance: Images are processed server-side to ensure your site stays fast for visitors.
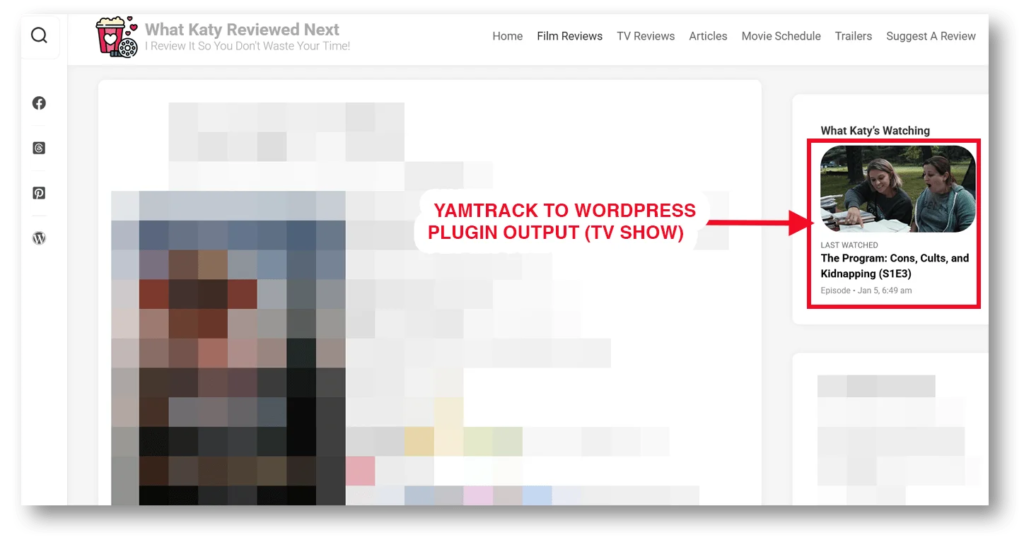
Here it is in action:
How to Get It
I’ve made the entire project Open Source. Whether you’re a developer who wants to tweak the code or just someone who wants their site to look a bit more “live,” you can grab it today.
Download the latest release from Gitbub here
Quick Start: The 3-Minute Setup
Once you’ve installed the plugin on WordPress, you only need to configure one file to get the sync moving. Here is exactly what to do:
1. The Ingredients
You will need two pieces of information from your WordPress Settings > Yamtrack Sync page:
- Your Secret Key: (Keep this private!)
- Your API URL: (e.g., https://your-site.com/wp-json/update/v1/yamtrack)
If you download the zip file from the settings page these variables are already automatically added to your python script. If you’re editing the script manually you can find this information at the bottom of the plugin setting page.
2. Configure the Python Script
Your secret key and API URL should be auto-configured but you will need to ensure that the path to your database folder is set correctly:
# --- CONFIGURATION ---
# Replace these with the values from your WordPress Admin panel
WP_URL = '[should be auto-filled]'
SECRET_KEY = '[should be auto-filled]'

# The full path to the folder containing your Yamtrack db.sqlite3
# Example: '/home/docker/yamtrack'
DB_PATH = '/path/to/your/yamtrack/databasefolder'
If you need help finding your Database Path you can run the following command from your Yamtrack server command line:
Type: find / -name "db.sqlite3" 2>/dev/null
You can change the database name if needed here too but if you ran the default Yamtrack install you should be good to go
3. Upload Your Python Script
Upload your python script to your Yamtrack server. You can store it anywhere but I’d recommend adding it to your main Yamtrack folder to keep things neat and tidy.
The default Yamtrack install location is:
/home/[YourServerName]/Yamtrack
4. Run An Initial Sync
From your Yamtrack server command line run your first sync by entering:
python3 /home/[YourServerName]/Yamtrack/yam_to_wp.py
If you get a “permission denied” error, run the above command as Sudo and enter your password when prompted
The required files to track changes will be created and your WordPress site should be “pinged”. If you’ve already added the shortcode to your site, on refreshing your last watched TV show or Movie should now be displayed!
5. Set A Schedule
In order to tell WordPress that you’ve watched something new you’ll need to schedule the python script to run on a schedule.
I recommend 15 minutes but you can change the frequency if you wish.
The schedule is run through Linux’s inbuilt cron functionality. To enable this:
1. Type: crontab -e (if you're running this for the first time, select nano as that's the easiest editor)
2. Scroll to the bottom and paste this line (adjusting the path):
# Format: Minute Hour Day Month DayOfWeek Command
# This runs every 15 minutes:
*/15 * * * * /usr/bin/python3 /path/to/your/folder/yam_to_wp.py >> /path/to/your/folder/sync.log 2>&1

3. CTRL+O, then Enter to save the file

4. CTRL+X to exit the nano editor
And that’s it! Your watch history will be checked every 15 minutes and if anything has changed it’ll update your WordPress site – nice!
Pro-Tips for a Smooth Experience
- Always On: For the best results, run this script on a device that stays on, like a Home Server, a Raspberry Pi, or even an old laptop.
- The Shortcode: To show your data to the world, just paste
[kwwd_show_yamtrack_last_watched]into any Page, Post, or Widget. - Custom Styling: The output is wrapped in a CSS class called
.kwwd-yamtrack-display. If you know a little CSS, you can make it match your theme perfectly if the supplied style options don’t work for you.
Troubleshooting (Read this before panicking!)
- “Script says 401 Unauthorized”: This means your SECRET_KEY in the Python script doesn’t match the one in your WordPress settings. Copy-paste them again to be sure.
- “SSL Error”: If you are testing on a local site (like localhost or .localdev) without an SSL certificate, the script might struggle to connect. This plugin is designed for live sites with https://.
- Images not showing: Ensure your WordPress “Uploads” folder is writable. The plugin saves a local copy of the artwork to keep your site loading fast!
Reporting Issues Or Requesting Functionality
If you come across any bugs or have a feature request you can create an issue/feature request on Github (you’ll need an account to post, don’t worry it’s free!)
Supporting the Project
I wrote this because I needed it, and I’m sharing it because I think others might too. If you find it useful or it saves you a few hours of coding, feel free to support me on Ko-Fi or share the plugin on social media and with your friends.
Happy watching and happy tracking!