If you want to add custom formatting to your content but don’t want to have to go into the HTML view and manually type it each time, this code snippet is for you!
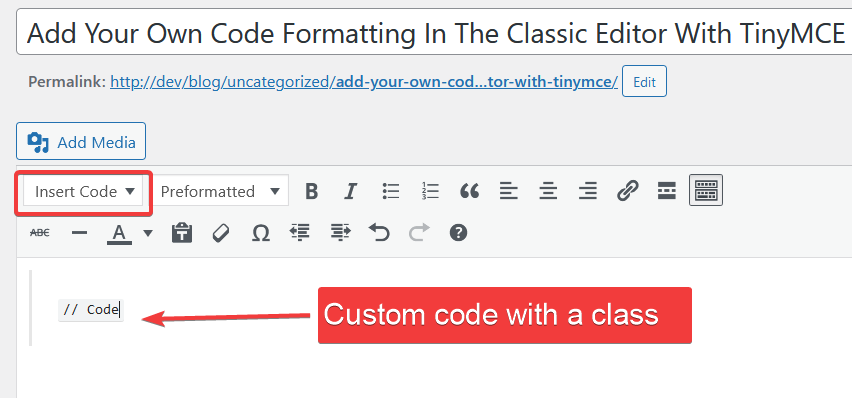
Using the following code snippets you’ll be able to create your own button for the TinyMCE editor and add your <pre><code> tags including associated classes to style for the language of your choice
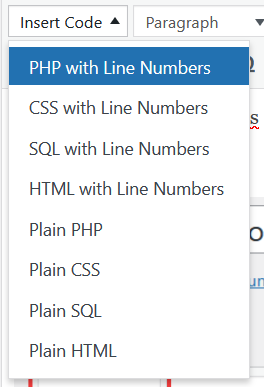
Choosing the above “PHP with Line Numbers” will insert the following code where your cursor is:
<pre><code class="language-php line-numbers">// Code</code></pre>You can then replace the “//code” text with your own custom code.
So, how do we achieve this?
In your functions.php file add the following code which will create a new TinyMCE button with an id of “codeinsert”
/** TINYMCE STUFF **/

add_action( 'init', 'my_custom_tinymce_init' );

// Only Run This If We' have a user with a role that can edit posts
function my_custom_tinymce_init() {
  if ( ! current_user_can( 'edit_posts' ) && ! current_user_can( 'edit_pages' ) ) {
    return;
  }

  add_filter( 'mce_external_plugins', 'my_custom_tinymce_plugins' );
  add_filter( 'mce_buttons', 'my_custom_tinymce_buttons' );
}

//initialise our javascript code and load it
function my_custom_tinymce_plugins( $plugins ) {
  $plugins['codeinsert'] = esc_url(get_stylesheet_directory_uri()) . '/js/my-tinymce.js'; // Replace with your JS file path
  return $plugins;
}

// Add the button to the beginning of the toolbar
function my_custom_tinymce_buttons( $buttons ) {
  array_unshift( $buttons, 'codeinsert' );
  return $buttons;
}
/** END TinyMCE Code **/
We then need to create the code that will create the dropdown menu. In the above example, our child theme has a folder called “js” which contains a javascript file called “my-tinymce.js”. This JavaScript file contains all of the styles we will insert from the dropdown:
(function () {
tinymce.PluginManager.add('codeinsert', function (editor) {
editor.addButton('codeinsert', {
type: 'listbox',
text: 'Insert Code',
icon: false,
onselect: function (e) {
editor.insertContent(this.value());
},
values: [
{ text: 'PHP with Line Numbers', value: '<pre><code class="language-php line-numbers">// Code</code></pre>' },
{ text: 'CSS with Line Numbers', value: '<pre><code class="language-css line-numbers">// Code</code></pre>' },
{ text: 'SQL with Line Numbers', value: '<pre><code class="language-sql line-numbers">// Code</code></pre>' },
{ text: 'HTML with Line Numbers', value: '<pre><code class="language-html line-numbers">// Code</code></pre>' },
{ text: 'Plain PHP', value: '<pre><code class="language-php">// Code</code></pre>' },
{ text: 'Plain CSS', value: '<pre><code class="language-css">// Code</code></pre>' },
{ text: 'Plain SQL', value: '<pre><code class="language-sql">// Code</code></pre>' },
{ text: 'Plain HTML', value: '<pre><code class="language-html">// Code</code></pre>' },
// Add more code options as needed
]
});
});
})();
Note that for the above code to function correctly you MUST have the Classic Editor plugin enabled – this will remove all Guttenberg block functionality from the Posts/Page edit pages.
The above code allows you to add styles into the editor so you can style content that will be formatted by the Prism.js code snippet styling framework, although you can amend the “values” in the JavaScript file to add any valid html to the editor.